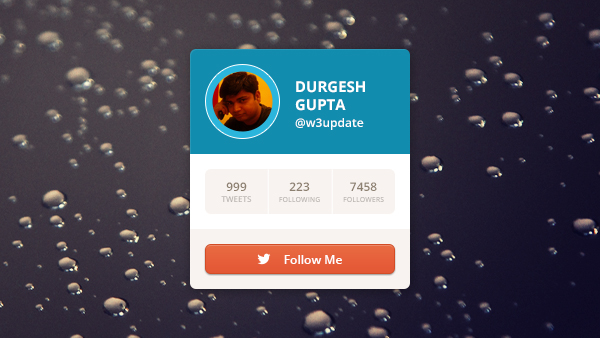
A twitter widget of your profile can be place inside your blog or your personal portfolio or any other website.
This includes a space for your profile image, username, follower/tweet details, and a visually appealing call-to-action button.
Here in this tutorial I am going to share with you how you can create such widget.
Step 1: Create Photoshop Layout
like any other xhtml and css creation you have to start first by creating a photoshop mockup. like below image.

once your psd is created you can now open Dreamweaver or any other similar html editor to create html and css file. To create profile twitter widget I am going to create two files namely main.css for case cading stylesheet (css) and a html file called twitter-widget.html.
Step 2: Star coding in html
<!--
 --- @freebie: twitter-widget
 --- @author: Durgesh Gupta http://www.durgeshgupta.com
 -->

<!DOCTYPE html>
<html lang="en">
<head>
	<meta charset="utf-8"/>
	<title>twitter-widget by Durgesh Gupta</title>

	<link rel="stylesheet" href="styles/main.css" type="text/css" media="screen" charset="utf-8" />

	<style>
		/* General Styles */
		center > h4 { color: #c5c5c5; margin-top: 50px; }
		body { margin: 0; font-family: Arial; background-color: #ddd; }
		ul#twitter-widget-freebie { display: table; list-style: none; margin: 0 auto; padding: 0; }
		ul#twitter-widget-freebie > li { float: left; margin-right: 20px; margin-bottom: 20px; padding: 10px 10px; }
		ul#twitter-widget-freebie > li:last-child { margin-right: 0; }
		ul#twitter-widget-freebie > li > span { margin-bottom: 10px; }
	</style>
</head>
<body>
<div class="main-container">
<!--	<center><h4>twitter-widget</h4></center>-->
	<ul id="twitter-widget-freebie">
		<li>
			<div id="twitter-widget">
				<div class="user">
					<div class="avatar">
						<img src="images/avatar.png" alt="avatar"/>
					</div>
					<div class="data">
						<span class="name">Durgesh<br/>
Gupta</span>
						@w3update
					</div>
				</div>
				<div class="details">
					<ul>
						<li>
							<span class="number">999</span>
							Tweets
						</li>
						<li>
							<span class="number">223</span>
							Following
						</li>
						<li>
							<span class="number">7458</span>
							Followers
						</li>
					</ul>
				</div>
				<div class="button">
					<a href=""><span class="btn-orange"><span class="text" style="background-image: url(images/follow.png)">Follow Me</span></span></a>
				</div>
			</div>
		</li>
	</ul>
    </div>
</body>
</html>
Step 3: Create CSS file
/*
 * @freebie: twitter-widget
 * @author: Durgesh Gupta http://www.w3update.com
 */

* { outline: none !important; margin: 0; padding: 0; }
a, a:visited, a:hover, a:active { text-decoration: none; color: inherit; }

.main-container{ margin:0px auto; padding:40px 0 0 0; width:600px; height:338px; background:url(../images/bg.jpg) 0 0 no-repeat;}
#twitter-widget
{
	display: table;
	overflow: hidden;
	-webkit-border-radius: 5px;
	-moz-border-radius: 5px;
	border-radius: 5px;
	width: 250px;
}

#twitter-widget > .user
{
	display: table;
	width: 100%;
	background-color: #128cae;
	padding: 15px;
	-moz-box-sizing: border-box !important;
	-webkit-box-sizing: border-box !important;
	box-sizing: border-box !important;
}

#twitter-widget > .user > .avatar
{
	display: table;
	float: left;
	border: 1px solid #FFF;

	-webkit-border-radius: 100px;
	-moz-border-radius: 100px;
	border-radius: 100px;
	padding: 10px;
}
#twitter-widget > .user > .avatar > img
{
	display: block;
	margin: 0 auto;

	-webkit-border-radius: 100px;
	-moz-border-radius: 100px;
	border-radius: 100px;
}

#twitter-widget > .user > .data
{
	float: right;
	margin-right: 20px;
	color: white;
	font-size: 12px;
}

#twitter-widget > .user > .data > span.name
{
	margin-top:5px;
	display: block;
	text-transform: uppercase;
	font-weight: bold;
	line-height: 20px;
	margin-bottom: 10px;
	font-size: 14px;
}

#twitter-widget > .details
{
	display: table;
	width: 100%;
	background-color: #fff;
	padding: 15px;
	-moz-box-sizing: border-box !important;
	-webkit-box-sizing: border-box !important;
	box-sizing: border-box !important;
}

#twitter-widget > .details > ul
{
	margin: 0 auto;
}

#twitter-widget > .details > ul li
{
	list-style: none;
	width: 33%;
	border-right: 1px solid #fff;
	background-color: #f8f3f0;
	float: left;
	font-size: 8px;
	padding: 13px;
	text-align: center;
	color: #8d8070;
	text-transform: uppercase;
	overflow: hidden;
	-moz-box-sizing: border-box !important;
	-webkit-box-sizing: border-box !important;
	box-sizing: border-box !important;
}

#twitter-widget > .details > ul li:first-child
{
	-webkit-border-top-left-radius: 5px;
	-webkit-border-bottom-left-radius: 5px;
	-moz-border-radius-topleft: 5px;
	-moz-border-radius-bottomleft: 5px;
	border-top-left-radius: 5px;
	border-bottom-left-radius: 5px;
}

#twitter-widget > .details > ul li:last-child
{
	border: 0;
	-webkit-border-top-right-radius: 5px;
	-webkit-border-bottom-right-radius: 5px;
	-moz-border-radius-topright: 5px;
	-moz-border-radius-bottomright: 5px;
	border-top-right-radius: 5px;
	border-bottom-right-radius: 5px;
}

#twitter-widget > .details > ul li > span.number
{
	display: block;
	font-weight: bold;
	font-size: 14px;
	text-align: center;
}

#twitter-widget > .button
{
	width: 100%;
	padding: 15px;
	background-color: #f8f3f0;
	-moz-box-sizing: border-box !important;
	-webkit-box-sizing: border-box !important;
	box-sizing: border-box !important;
}

#twitter-widget > .button
{
	width: 100%;
	padding: 15px;
	background-color: #f8f3f0;
	-moz-box-sizing: border-box !important;
	-webkit-box-sizing: border-box !important;
	box-sizing: border-box !important;
}

.btn-orange
{
	display: block;
	border: 1px solid #d24c25;
	font-size: 12px;
	color: white;
	background: rgba(237,137,107,1);
	background: -moz-linear-gradient(top, rgba(237,137,107,1) 0%, rgba(228,89,54,1) 100%);
	background: -webkit-gradient(left top, left bottom, color-stop(0%, rgba(237,137,107,1)), color-stop(100%, rgba(228,89,54,1)));
	background: -webkit-linear-gradient(top, rgba(237,137,107,1) 0%, rgba(228,89,54,1) 100%);
	background: -o-linear-gradient(top, rgba(237,137,107,1) 0%, rgba(228,89,54,1) 100%);
	background: -ms-linear-gradient(top, rgba(237,137,107,1) 0%, rgba(228,89,54,1) 100%);
	background: linear-gradient(to bottom, rgba(237,137,107,1) 0%, rgba(228,89,54,1) 100%);
	filter: progid:DXImageTransform.Microsoft.gradient( startColorstr='#ed896b', endColorstr='#e45936', GradientType=0 );
	text-align: center;
	padding: 7px 0;
	-webkit-border-radius: 5px;
	-moz-border-radius: 5px;
	border-radius: 5px;

	-webkit-box-shadow: inset 0px 1px 0px 0px rgba(255,255,255,0.3), 0px 3px 5px -3px rgba(0,0,0,0.3);
	-moz-box-shadow: inset 0px 1px 0px 0px rgba(255,255,255,0.3), 0px 3px 5px -3px rgba(0,0,0,0.3);
	box-shadow: inset 0px 1px 0px 0px rgba(255,255,255,0.3), 0px 3px 5px -3px rgba(0,0,0,0.3);
	font-weight: bold;
}

.btn-orange:hover
{
	background: rgba(228,89,54,1);
}

.btn-orange:active
{
	background: rgba(228,89,54,1);
	-webkit-box-shadow: inset 0px 3px 5px -3px rgba(0,0,0,0.3);
	-moz-box-shadow: inset 0px 3px 5px -3px rgba(0,0,0,0.3);
	box-shadow: inset 0px 3px 5px -3px rgba(0,0,0,0.3);
}

.btn-orange > .text
{
	padding-left: 25px;
	background: no-repeat left center;
}
Note:- to remove the widget background remove the html tag having class name main-container mention in css, to do so jump on line number 25 of html code and 9 of css file.
[button link=”http://www.w3update.com/demo/profile-twitter-widget/twitter-widget.html” size=”medium” target=”_blank”]Demo[/button] / [social-locker locker_id=”01c71ecc4900f0ae4″ theme=”blue” message=”Share this page to download this tutorial source!” facebook=”true” likeurl=”CURRENT” google=”true” googleurl=”CURRENT” tweet=”true” tweettext=”” tweeturl=”CURRENT” follow=”true” linkedin=”true” linkedinurl=”CURRENT”][button link=”https://wpblog.webanaya.com/wp-content/uploads/2013/06/twitter-widget-by-Durgesh.zip” size=”medium” target=”_blank”]Download[/button][/social-locker]